
开始写这一系列博客之前先要向大家说声抱歉,放肆雷特建立很久却很少有更新。当然博客人气也不旺,大部分都是看的人多评论收藏的人少。一直想要改变这种状态,正好赶上了最近工作上做了一个高仿360安全卫士窗体。所以将开发历程分享出来,一来希望能和大家交流共同学习成长;二来希望自己的放肆雷特能有人光顾。
这一系列的文章所用到的技术首先要感谢苏飞大哥,我也是在很早以前看了他的QQ皮肤制作文章之后得到的灵感和一些相关知识。在这里帮他的C#论坛打个广告,里面有不少比较有用的资料。苏飞大哥也是很用心的打理这个论坛,论坛地址http://www.sufeinet.com/。

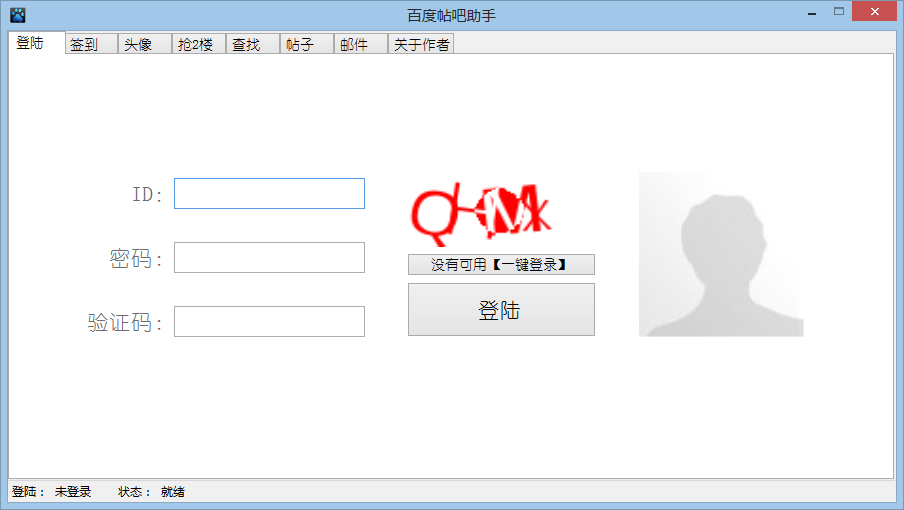
说了这么多也该进入主题了,首先为了让大家有兴趣看下去而且认同我开发的这个皮肤,所以先传上本程序的界面截图(不喜勿喷)。同时本人也先声明,本人属屌丝一枚,想法和思路可能比较落后,如果你有比较不错的想法和思路可以在本论坛中寻找本人qq或评论本文。
第一章:360安全卫士窗体素材提取
360安全卫士的窗体使用的素材比之前QQ的素材更容易提取首先安装360安全卫士,如果怕自己电脑中毒的请使用虚拟机进行安装。在这里不提供下载链接。安装好之后打开安装目录,我这里以安装到C盘为准:C:\Program Files (x86)\360\360safe\Config\newui\themes\default
打开后,将default_theme.ui文件拷贝出来。再将它的后缀改名为rar。之后的操作你懂的呀。。操作之后得到
第二章:360安全卫士风格按钮开发
得到以上素材之后开始正式的编码,第一个要开发的控件是Button控件,为什么呢?因为窗体上的关闭、最大化、最小化这些按钮都可以使用。系统里面用到的WinApi类我就不放上来了,网上一搜一大把,如果有需要的可以单独向我索取。写按钮前,先枚举该按钮的所有状态,我这里定义5个状态,应该比较全了:
/// <summary>
/// 枚举按钮状态
/// </summary>
public enum State
{
    Normal = 1,//按钮默认时
    MouseOver = 2,//鼠标移上按钮时
    MouseDown = 3,//鼠标按下按钮时
    Disable = 4,//当不启用按钮时(也就是按钮属性Enabled==Ture时)
    Default = 5//控件得到Tab焦点时
}
重绘按钮以及重绘其它控件及窗体用到的方法:
1、该方法是将素材切割后再进行绘制,这样在按钮大小发生改变时也不会对素材的大小有影响:
/// <summary>
/// 绘图对像
/// </summary>
/// <param name="g">绘图对像</param>
/// <param name="img">图片</param>
/// <param name="r">绘置的图片大小、坐标</param>
/// <param name="lr">绘置的图片边界</param>
/// <param name="index">当前状态</param>
/// <param name="Totalindex">状态总数</param>
public static void DrawRect(Graphics g, Bitmap img, Rectangle r, Rectangle lr, int index, int Totalindex)
{
    if (img == null) return;
    Rectangle r1, r2;
    int x = (index - 1) * img.Width / Totalindex;
    int y = 0;
    int x1 = r.Left;
    int y1 = r.Top;

    if (r.Height > img.Height && r.Width <= img.Width / Totalindex) { r1 = new Rectangle(x, y, img.Width / Totalindex, lr.Top); r2 = new Rectangle(x1, y1, r.Width, lr.Top); g.DrawImage(img, r2, r1, GraphicsUnit.Pixel); r1 = new Rectangle(x, y + lr.Top, img.Width / Totalindex, img.Height - lr.Top - lr.Bottom); r2 = new Rectangle(x1, y1 + lr.Top, r.Width, r.Height - lr.Top - lr.Bottom); if ((lr.Top + lr.Bottom) == 0) r1.Height = r1.Height - 1; g.DrawImage(img, r2, r1, GraphicsUnit.Pixel); r1 = new Rectangle(x, y + img.Height - lr.Bottom, img.Width / Totalindex, lr.Bottom); r2 = new Rectangle(x1, y1 + r.Height - lr.Bottom, r.Width, lr.Bottom); g.DrawImage(img, r2, r1, GraphicsUnit.Pixel); }
    else if (r.Height <= img.Height && r.Width > img.Width / Totalindex)
    {
        r1 = new Rectangle(x, y, lr.Left, img.Height);
        r2 = new Rectangle(x1, y1, lr.Left, r.Height);
        g.DrawImage(img, r2, r1, GraphicsUnit.Pixel);
        r1 = new Rectangle(x + lr.Left, y, img.Width / Totalindex - lr.Left - lr.Right, img.Height);
        r2 = new Rectangle(x1 + lr.Left, y1, r.Width - lr.Left - lr.Right, r.Height);
        g.DrawImage(img, r2, r1, GraphicsUnit.Pixel);
        r1 = new Rectangle(x + img.Width / Totalindex - lr.Right, y, lr.Right, img.Height);
        r2 = new Rectangle(x1 + r.Width - lr.Right, y1, lr.Right, r.Height);
        g.DrawImage(img, r2, r1, GraphicsUnit.Pixel);
    }
    else if (r.Height <= img.Height && r.Width <= img.Width / Totalindex)
    {
        r1 = new Rectangle((index - 1) * img.Width / Totalindex, 0, img.Width / Totalindex, img.Height);
        g.DrawImage(img, new Rectangle(x1, y1, r.Width, r.Height), r1, GraphicsUnit.Pixel);
    }
    else if (r.Height > img.Height && r.Width > img.Width / Totalindex)
    {
        //top-left
        r1 = new Rectangle(x, y, lr.Left, lr.Top);
        r2 = new Rectangle(x1, y1, lr.Left, lr.Top);
        g.DrawImage(img, r2, r1, GraphicsUnit.Pixel);

        //top-bottom
        r1 = new Rectangle(x, y + img.Height - lr.Bottom, lr.Left, lr.Bottom);
        r2 = new Rectangle(x1, y1 + r.Height - lr.Bottom, lr.Left, lr.Bottom);
        g.DrawImage(img, r2, r1, GraphicsUnit.Pixel);

        //left
        r1 = new Rectangle(x, y + lr.Top, lr.Left, img.Height - lr.Top - lr.Bottom);
        r2 = new Rectangle(x1, y1 + lr.Top, lr.Left, r.Height - lr.Top - lr.Bottom);
        g.DrawImage(img, r2, r1, GraphicsUnit.Pixel);

        //top
        r1 = new Rectangle(x + lr.Left, y,
        img.Width / Totalindex - lr.Left - lr.Right, lr.Top);
        r2 = new Rectangle(x1 + lr.Left, y1,
        r.Width - lr.Left - lr.Right, lr.Top);
        g.DrawImage(img, r2, r1, GraphicsUnit.Pixel);

        //right-top
        r1 = new Rectangle(x + img.Width / Totalindex - lr.Right, y, lr.Right, lr.Top);
        r2 = new Rectangle(x1 + r.Width - lr.Right, y1, lr.Right, lr.Top);
        g.DrawImage(img, r2, r1, GraphicsUnit.Pixel);

        //Right
        r1 = new Rectangle(x + img.Width / Totalindex - lr.Right, y + lr.Top,
        lr.Right, img.Height - lr.Top - lr.Bottom);
        r2 = new Rectangle(x1 + r.Width - lr.Right, y1 + lr.Top,
        lr.Right, r.Height - lr.Top - lr.Bottom);
        g.DrawImage(img, r2, r1, GraphicsUnit.Pixel);

        //right-bottom
        r1 = new Rectangle(x + img.Width / Totalindex - lr.Right, y + img.Height - lr.Bottom,
        lr.Right, lr.Bottom);
        r2 = new Rectangle(x1 + r.Width - lr.Right, y1 + r.Height - lr.Bottom,
        lr.Right, lr.Bottom);
        g.DrawImage(img, r2, r1, GraphicsUnit.Pixel);

        //bottom
        r1 = new Rectangle(x + lr.Left, y + img.Height - lr.Bottom,
        img.Width / Totalindex - lr.Left - lr.Right, lr.Bottom);
        r2 = new Rectangle(x1 + lr.Left, y1 + r.Height - lr.Bottom,
        r.Width - lr.Left - lr.Right, lr.Bottom);
        g.DrawImage(img, r2, r1, GraphicsUnit.Pixel);

        //Center
        r1 = new Rectangle(x + lr.Left, y + lr.Top,
        img.Width / Totalindex - lr.Left - lr.Right, img.Height - lr.Top - lr.Bottom);
        r2 = new Rectangle(x1 + lr.Left, y1 + lr.Top,
        r.Width - lr.Left - lr.Right, r.Height - lr.Top - lr.Bottom);
        g.DrawImage(img, r2, r1, GraphicsUnit.Pixel);
    }
}

/// <summary>
/// 绘图对像
/// </summary>
/// <param name="g">绘图对像</param>
/// <param name="img">图片</param>
/// <param name="r">绘置的图片大小、坐标</param>
/// <param name="index">当前状态</param>
/// <param name="Totalindex">状态总数</param>
public static void DrawRect(Graphics g, Bitmap img, Rectangle r, int index, int Totalindex)
{
    if (img == null) return;
    int width = img.Width / Totalindex;
    int height = img.Height;
    Rectangle r1, r2;
    int x = (index - 1) * width;
    int y = 0;
    r1 = new Rectangle(x, y, width, height);
    r2 = new Rectangle(r.Left, r.Top, r.Width, r.Height);
    g.DrawImage(img, r2, r1, GraphicsUnit.Pixel);
}
2、该方法是将编译好的图片读取出来
/// <summary>
/// 得到要绘置的图片对像
/// </summary>
/// <param name="str">图像在程序集中的地址</param>
public static Bitmap GetResBitmap(string str)
{
    Stream sm;
    sm = FindStream(str);
    if (sm == null) return null;
    return new Bitmap(sm);
}

/// <summary>
/// 得到图程序集中的图片对像
/// </summary>
/// <param name="str">图像在程序集中的地址</param>
private static Stream FindStream(string str)
{
    Assembly assembly = Assembly.GetExecutingAssembly();
    string[] resNames = assembly.GetManifestResourceNames();
    foreach (string s in resNames)
    {
        if (s == str)
        {
            return assembly.GetManifestResourceStream(s);
        }
    }
    return null;
}
Ok,基础打好之后就可以开始正式的进行按钮绘制,代码比较长,里面包括定义变量,定义按钮属性,处理按钮构造函数。这里我分享关键部分重写OnPaint代码:
/// <summary>
/// 重绘控件
/// </summary>
protected override void OnPaint(System.Windows.Forms.PaintEventArgs e)
{
    if (BackImg == null)
    {
        base.OnPaint(e);
        return;
    }

    int i = (int)state;
    if (this.Focused && state != State.MouseDown && _IsTabFocus == true) i = 5;
    if (!this.Enabled) i = 4;
    Rectangle rc = this.ClientRectangle;
    Graphics g = e.Graphics;

    base.InvokePaintBackground(this, new PaintEventArgs(e.Graphics, base.ClientRectangle));
    try
    {
        if (BackImg != null)
        {
            if (_BacklightLTRB != Rectangle.Empty)
            {

                ImageDrawRect.DrawRect(g, BackImg, rc, Rectangle.FromLTRB(_BacklightLTRB.X, _BacklightLTRB.Y, _BacklightLTRB.Width, _BacklightLTRB.Height), i, 5);
            }
            else
            {
                ImageDrawRect.DrawRect(g, BackImg, rc, Rectangle.FromLTRB(10, 10, 10, 10), i, 5);
            }

        }
    }
    catch
    { }

    Image img = null;
    Size txts, imgs;

    txts = Size.Empty;
    imgs = Size.Empty;

    if (this.Image != null)
    {
        img = this.Image;
    }
    else if (this.ImageList != null && this.ImageIndex != -1)
    {
        img = this.ImageList.Images[this.ImageIndex];
    }

    if (img != null)
    {
        imgs.Width = img.Width;
        imgs.Height = img.Height;
    }

    StringFormat format1;
    using (format1 = new StringFormat())
    {
        format1.HotkeyPrefix = System.Drawing.Text.HotkeyPrefix.Show;
        SizeF ef1 = g.MeasureString(this.Text, this.Font, new SizeF((float)rc.Width, (float)rc.Height), format1);
        txts = Size.Ceiling(ef1);
    }

    rc.Inflate(-4, -4);
    if (imgs.Width * imgs.Height != 0)
    {
        Rectangle imgr = rc;
        imgr = ImageDrawRect.HAlignWithin(imgs, imgr, this.ImageAlign);
        imgr = ImageDrawRect.VAlignWithin(imgs, imgr, this.ImageAlign);
        if (!this.Enabled)
        {
            ControlPaint.DrawImageDisabled(g, img, imgr.Left, imgr.Top, this.BackColor);
        }
        else
        {
            g.DrawImage(img, imgr.Left, imgr.Top, img.Width, img.Height);
        }
    }

    Rectangle txtr = rc;
    txtr = ImageDrawRect.HAlignWithin(txts, txtr, this.TextAlign);
    txtr = ImageDrawRect.VAlignWithin(txts, txtr, this.TextAlign);

    format1 = new StringFormat();
    format1.HotkeyPrefix = System.Drawing.Text.HotkeyPrefix.Show;

    if (this.RightToLeft == RightToLeft.Yes)
    {
        format1.FormatFlags |= StringFormatFlags.DirectionRightToLeft;
    }
    brush = new SolidBrush(this.ForeColor);
    g.DrawString(this.Text, this.Font, brush, (RectangleF)txtr, format1);
    brush.Dispose();

}
其中关键部分已经出来,按钮也基本绘制完成。下一篇我将分享重绘主窗体,其中过程也没有详细讲解,主要原因是文采不好。如果有不了解的可以留言给我,我会及时回复。该皮肤的源码由于项目上正在使用暂时不进行公布,如果本文的反响和关注度都不错,我再决定是否提供下载。最后谢谢大家的关注。请期待下一篇的重绘主窗体。
本博客所有文章如无特别注明均为原创
如果觉得对你有帮助,可以通过下方打赏对作者表示鼓励
本文采用知识共享署名-非商业性使用-相同方式共享
如若转载,请注明出处:《C#制作高仿360安全卫士窗体(一)- 主窗体》https://www.fangsi.net/372.html
 微信扫一扫
微信扫一扫  支付宝扫一扫
![[原创]美工必备小工具《屏幕颜色拾取器》](https://www.fangsi.net/wp-content/uploads/2012/05/2012032223210076.jpg)


评论列表(13条)
BackImg 这个是不是需要引用什么才能用?
@龙孝天下:Backimg是一个Bitmap类型的变量。里面储存的是窗体的背景,你可以看我后面写的文章里面有定义这个变量的代码。
@锋哥:有没有完整的源码啊?
@龙孝天下:没有,没有整理。
胖哥,代码不是说过几天就贴么?
@tension:工作太忙,搁置了。实在不好意思。
能发一下源代码不 谢谢了
@风雪孤狼:源码正在整理中,过几天就发布出来。敬请关注。
楼主啊,没有源码可提供下载吗?
@dzhl:暂时还没有进行整理,到时候整理好了会发布到这上面。请多多关注喔。
怎么这篇文章没有下文了呢,我还在一直关注呢,苦逼的公司网络进行关键字过滤,结果搞得打开博客园后页面效果出错了,无法回复希望楼主继续啊
@轩辕公子:谢谢关注,最近工作比较忙没有花很多时间来写这些,不过我会尽快发布出来的。
@轩辕公子:第二篇出来了喔,再次感谢关注,第二篇地址:http://www.fangsi.net/archives/435.html